The functionality Create a personalized e-mail, feature of K inventory software, allows you to send e-mails on a scheduled basis, or in response to a specific action.
This feature allows you to be alerted when an action occurs, to avoid stock-outs and gain fine-grained visibility of your inventory.
This feature is only available on the Web version.
1. In the left-hand menu, click on the Settings
2. Click on the Custom notification
3. Click on the Create e-mail
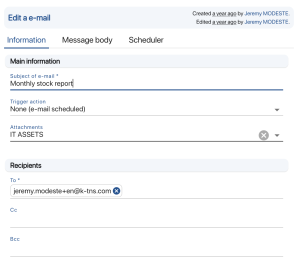
4. In the Information tab tab of the Create e-mail fill in the email subject
5. In the Recipients section, enter the email recipients

Email creation interface
Two types of personalized e-mail can be created, with different personalization options depending on the choice made.
Trigger actions allow you to send the email each time a specific action is performed, such as the receipt of an order or the creation of a file on the platform.
Scheduled e-mails allow you to configure the sending of notifications in relation to a specific period (day, week, month, etc.). This makes it possible, for example, to send an Excel export and graphs on the first day of each month.
6. Select the attachment(s) to be included in the email
You can attach customized graphics and Shared views.
7. Click on the Message body and fill in the information to be sent in the e-mail
8. To set the e-mail frequency, click on the Scheduler tab
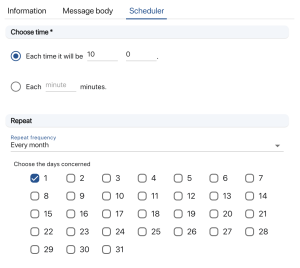
9. Choose the times and repetition of e-mail dispatches in the sections Choose the time and Repeat
You can choose the sending times:
- At a certain time
- Every X hours and Y minutes
- Every X minutes
Repeat shipments:
- Every day
- Certain days of the week
- Some days of the month
- Certain months of the year

Example of e-mail scheduling
10. Save your changes by clicking on the Save
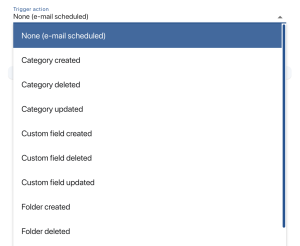
6. Choose a trigger action from the drop-down list

Overview of trigger actions
7. Click on the Message body and fill in the information to be sent in the e-mail
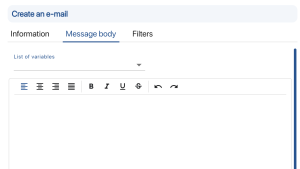
8. You can click on the Variable list then on the variable in the drop-down list to add it to the mail body
For example, with the trigger action Category created you can add the variables Created on and Name in the body of the email to send the creation date and the name of the category created.
You can add several variables in the Message body to make your mail more complete.

Edit your own notification body
9. To specify when the e-mail is to be sent, click on the Filters
10. Create an advanced filter in the Trigger entity filters

Advanced filter example: to retain import transactions
To learn how to create advanced filters, click on this link
11. To add a Notification condition click on the condition button then choose a comparison mode from the drop-down list
12. Enter reference value against which to make the comparison
You can compare with a fixed value or in relation to the data in a field.
In the following example, the filter value should be equal to Alert threshold for sending to be validated.
To switch from one type of reference value to the other, click on the  or
or  .
.
Visit Notification conditions apply only to Filters on the entity linked to the trigger.
The following configuration allows you to specify the conditions for sending an e-mail.

E-mail sending condition

Transaction type filter
This configuration allows you to filter transactions so that only those of type import.

Filter condition
This condition allows you to specify the filter by indicating that the email should only be sent if the number of imported references is equal to 10.
The conditions for sending notification apply only to the Trigger entity filterIf the filter is empty, the condition will not be effective.
13. Save your changes by clicking on the Save
-
With planner
-
6. Select the attachment(s) to be included in the email
You can attach customized graphics and Shared views.
7. Click on the Message body and fill in the information to be sent in the e-mail
8. To set the e-mail frequency, click on the Scheduler tab
9. Choose the times and repetition of e-mail dispatches in the sections Choose the time and Repeat
You can choose the sending times:
- At a certain time
- Every X hours and Y minutes
- Every X minutes
Repeat shipments:
- Every day
- Certain days of the week
- Some days of the month
- Certain months of the year

Example of e-mail scheduling
10. Save your changes by clicking on the Save
-
With trigger
-
6. Choose a trigger action from the drop-down list

Overview of trigger actions
7. Click on the Message body and fill in the information to be sent in the e-mail
8. You can click on the Variable list then on the variable in the drop-down list to add it to the mail body
For example, with the trigger action Category created you can add the variables Created on and Name in the body of the email to send the creation date and the name of the category created.
You can add several variables in the Message body to make your mail more complete.

Edit your own notification body
9. To specify when the e-mail is to be sent, click on the Filters
10. Create an advanced filter in the Trigger entity filters

Advanced filter example: to retain import transactions
To learn how to create advanced filters, click on this link
11. To add a Notification condition click on the condition button then choose a comparison mode from the drop-down list
12. Enter reference value against which to make the comparison
You can compare with a fixed value or in relation to the data in a field.
In the following example, the filter value should be equal to Alert threshold for sending to be validated.
To switch from one type of reference value to the other, click on the  or
or  .
.
Visit Notification conditions apply only to Filters on the entity linked to the trigger.
The following configuration allows you to specify the conditions for sending an e-mail.

E-mail sending condition

Transaction type filter
This configuration allows you to filter transactions so that only those of type import.

Filter condition
This condition allows you to specify the filter by indicating that the email should only be sent if the number of imported references is equal to 10.
The conditions for sending notification apply only to the Trigger entity filterIf the filter is empty, the condition will not be effective.
13. Save your changes by clicking on the Save
To continue browsing, here are a few articles related to this page:


